
Call Us 📞 800-323-3130
Mon–Fri 8am–6pm CST, Sat–Sun 9am–1pm CST
Free design consultations
Showrooms in Miami & Fort Lauderdale
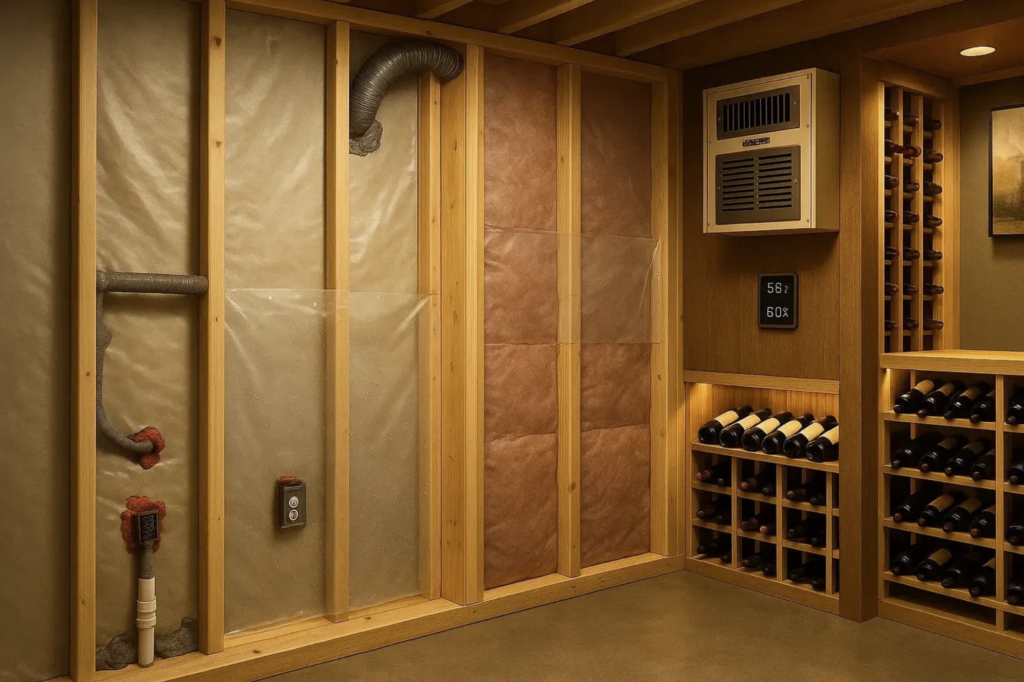
A properly constructed wine room is more than an attractive space filled with wine racks. Behind the finished walls is a carefully controlled environment designed to maintain stable temperature and humidity conditions.
One of the most overlooked parts of wine room construction is sealing penetrations through the wine room envelope.
Electrical outlets, lighting wires, HVAC lines, refrigerant pipes, ductwork, plumbing, doors, and other services can create small openings through the insulated enclosure. If these penetrations are not properly sealed, warm and humid air can enter the wine room, conditioned air can escape, and moisture can migrate into the wall assembly.
Over time, even relatively small gaps can compromise the performance of an otherwise well-designed wine cellar.
So, what are the best practices for sealing penetrations in a wine room envelope?
The answer is to treat every penetration as part of the overall insulation, air-sealing, and vapor-control strategy.
The wine room envelope is the combination of surfaces separating the conditioned wine-storage environment from the surrounding space.
This can include:
Exterior walls
Interior walls adjacent to unconditioned spaces
Ceiling
Floor
Wine cellar door
Glass enclosure
Framing
Insulation
Vapor-control layer
Service penetrations
The objective is to create a controlled environment that limits unwanted heat transfer, air leakage, and moisture migration.
A cooling system can only perform efficiently when the enclosure itself is properly constructed.
A penetration is any location where something passes through the wine room’s insulated or air-sealed envelope.
Common examples include:
Electrical wiring
Electrical outlets
Recessed lighting
Low-voltage wiring
Thermostat cables
Refrigerant lines
Condensate drains
HVAC ductwork
Supply and return registers
Plumbing pipes
Fire sprinkler piping
Security wiring
Internet cables
Speaker wires
Door framing
Glass enclosure components
Each penetration creates a potential pathway for air and moisture.
A small opening may not seem significant, but multiple unsealed penetrations can collectively affect the performance of the wine room.
The best time to address penetrations is before the wine room is closed up.
Before installing drywall, identify every service that will enter or leave the conditioned space.
Create a penetration plan covering:
Electrical
Lighting
HVAC
Cooling equipment
Plumbing
Drainage
Security
Audio/visual equipment
Sensors
Networking
Automation controls
Planning these locations early makes it much easier to properly seal the envelope.
It also reduces the need to cut into finished walls later.
One of the most important principles in wine room construction is maintaining a continuous air barrier.
The air barrier should remain continuous around the entire conditioned enclosure.
When an electrical wire or pipe passes through the wall, the air barrier is interrupted unless the opening is properly sealed.
Think of the wine room envelope as a continuous shell.
Every penetration needs to be treated as a location where that shell has been opened.
Electrical wiring is one of the most common sources of small air leaks.
Where wires pass through framing, insulation, or other parts of the enclosure, the surrounding gap should be sealed with an appropriate material compatible with the wall assembly.
Pay particular attention to:
Cable penetrations
Junction boxes
Electrical outlets
Switches
Lighting wiring
Low-voltage cables
Standard electrical boxes can create additional pathways for air movement, especially when installed in insulated walls.
Use appropriately rated electrical components and sealing methods where required by the applicable building code and the specific wall assembly.
Recessed lights can be particularly challenging in a wine room ceiling.
A recessed fixture may penetrate the ceiling air barrier and insulation.
If the fixture is not appropriate for the assembly, it can create:
Air leakage
Heat transfer
Insulation gaps
Moisture pathways
For wine cellar ceilings, surface-mounted or carefully detailed low-heat LED lighting can simplify the enclosure design.
If recessed lighting is required, select fixtures and installation methods appropriate for insulated and air-sealed assemblies.
Wine cooling systems often require penetrations for:
Refrigerant lines
Electrical wiring
Condensate drains
Control wiring
Ductwork
These penetrations should be sealed after installation rather than left as open gaps.
For split systems, the refrigerant-line penetration is especially important because multiple lines and cables may pass through the same opening.
The opening should be sized appropriately and sealed around the installed components using compatible materials.
There isn’t one sealant that is ideal for every wine room penetration.
Depending on the location and materials involved, contractors may use:
Low-expansion spray foam
Caulk
Acoustic sealant
Silicone sealant
Polyurethane sealant
Gaskets
Specialized air-sealing products
Mechanical flashing or sealing components
The correct product depends on the substrate, movement requirements, temperature, moisture exposure, and the role the sealant plays in the overall assembly.
The goal is not simply to fill a hole.
The goal is to create a durable air seal that remains compatible with the surrounding materials.
One common misconception is that stuffing insulation around a pipe or wire automatically seals the opening.
It doesn’t.
Fiberglass and similar insulation materials primarily provide thermal resistance. They are not necessarily an effective air barrier by themselves.
For example, if a pipe passes through an insulated wall and there is a gap around the pipe, simply filling the gap with insulation may still allow air movement.
The penetration should be properly air-sealed according to the wall assembly.
Ductwork can create relatively large openings compared with electrical wiring.
The area surrounding the duct should be properly integrated with the wine room’s air barrier and vapor-control strategy.
Pay attention to:
Duct sleeves
Supply registers
Return registers
Flexible duct connections
Duct insulation
Flanges
Framing openings
Poorly sealed duct penetrations can allow conditioned air to escape or warm, humid air to enter the enclosure.
For ducted wine cooling systems, coordinate ductwork and envelope construction from the beginning.
Air sealing and vapor control are related but are not exactly the same thing.
A wine room located in a hot, humid climate can be particularly sensitive to moisture migration.
The wall assembly should be designed so that moisture does not become trapped in an inappropriate location.
This is especially important in regions such as South Florida, where warm outdoor air can contain significant amounts of moisture.
A wine cellar professional and qualified building professional should determine the appropriate vapor-control strategy for the specific climate and construction assembly.
These two concepts are sometimes confused.
Air barrier: Helps control uncontrolled movement of air through the assembly.
Vapor control: Helps control moisture movement in vapor form through the assembly.
A material may perform one function without adequately performing the other.
A successful wine room envelope needs to consider both.
If plumbing passes through the wine room envelope, the opening should be carefully sealed around the pipe.
This includes:
Water supply pipes
Drain pipes
Condensate lines
Ice-maker connections
Bar plumbing
Sink drains
Sprinkler piping
Penetrations around plumbing can be particularly problematic because pipes may experience movement as temperatures change.
Use a sealing method appropriate for the pipe material and expected movement.
Wine cooling systems can generate condensate depending on system type and operating conditions.
The condensate drain should be properly routed and sealed where it passes through the wine room envelope.
An improperly detailed drain penetration can become an air and moisture pathway.
The drain should also be installed according to the cooling-system manufacturer’s requirements.
The door is technically a large penetration in the wine room envelope.
Even if the walls and ceiling are perfectly sealed, a poorly fitted door can undermine the performance of the enclosure.
A wine cellar door should have:
Proper weatherstripping
A tight perimeter seal
Correct installation
Appropriate insulation
Proper alignment
A suitable threshold or bottom seal
Door hardware and framing should also be installed without creating unnecessary gaps in the enclosure.
Modern wine rooms frequently use large glass panels.
Glass can provide a beautiful visual connection to the surrounding space, but the joints between glass, framing, walls, ceiling, and doors need careful detailing.
Potential leakage points include:
Glass-to-wall joints
Door frames
Panel joints
Corner connections
Ceiling transitions
Floor transitions
Cable and electrical penetrations
The enclosure should be treated as part of the wine room’s environmental envelope rather than simply as decorative architecture.
Ideally, air sealing should be completed before the walls are covered with final finishes.
This allows the installer to inspect the entire envelope.
Before closing the wall, verify:
Every wire penetration is sealed
Every pipe penetration is sealed
HVAC openings are detailed
Cooling-system penetrations are sealed
Insulation is continuous
Vapor-control materials are properly installed
Ceiling penetrations are addressed
Taking photographs before drywall installation can also provide a useful record of the concealed construction.
Not every penetration can simply be filled with ordinary spray foam or caulk.
Where a wall or ceiling has a required fire-resistance rating, penetrations may need to use an approved firestop system.
This is especially important for:
Electrical penetrations
Plumbing
HVAC penetrations
Larger openings
Rated walls
Multi-family buildings
Commercial wine rooms
Always follow applicable building codes and use products approved for the particular application.
Firestopping Is Not the Same as Air Sealing
A firestop product is designed for a specific fire-rated assembly and application.
An air-sealing product is intended to control air leakage.
Some products can perform multiple functions, but they should not automatically be treated as interchangeable.
The complete wall assembly and applicable code requirements determine the correct solution.
One of the simplest ways to improve wine room envelope performance is to reduce the number of holes in the enclosure.
Before construction, ask:
Does this component really need to penetrate the wine room envelope?
For example, equipment can sometimes be located outside the conditioned enclosure while only necessary connections enter the wine room.
Reducing penetrations makes the envelope easier to seal and inspect.
A final inspection should be part of the wine room construction process.
Walk around the entire enclosure and look for:
Visible gaps
Unsealed wires
Unsealed pipes
Cracks
Incomplete foam
Gaps around ductwork
Door leakage
Unsealed ceiling penetrations
Gaps around glass
Damaged vapor-control materials
Even small defects should be addressed before the wine room is placed into service.
A properly designed wine cooling system should establish appropriate airflow within the wine room.
If there are uncontrolled openings, pressure differences can pull warm, humid air through the enclosure.
This can lead to:
Condensation
Increased cooling load
Higher operating costs
Temperature instability
Moisture problems
The objective is to control where air enters and exits the wine room.
For high-value wine rooms, testing can provide additional confidence that the envelope is performing as intended.
Depending on the project, testing may include:
Visual inspection
Temperature monitoring
Humidity monitoring
Air-leakage testing
Infrared inspection
Cooling-system commissioning
For larger or more complex wine rooms, professional building-envelope testing may be worthwhile.
Mistake #1: Leaving small gaps untreated
A small gap around a wire or pipe may seem insignificant, but multiple gaps can add up.
Mistake #2: Using insulation as an air seal
Insulation does not automatically stop air movement.
Mistake #3: Ignoring ceiling penetrations
Heat and moisture problems can develop near the ceiling if penetrations aren’t properly sealed.
Mistake #4: Forgetting cooling-system penetrations
Refrigerant lines, electrical wiring, ducts, and drains all need to be integrated into the envelope.
Mistake #5: Installing finishes before inspecting the envelope
Once drywall, wood panels, and wine racks are installed, finding and correcting hidden air leaks becomes much more difficult.
Mistake #6: Using the wrong sealant
Sealants should be selected based on the substrate, movement, moisture conditions, fire requirements, and intended function.
Before closing the wine room walls, confirm:
☐ Electrical penetrations sealed
☐ Lighting penetrations sealed
☐ Low-voltage wiring sealed
☐ Cooling-system penetrations sealed
☐ Refrigerant lines sealed
☐ Condensate drain sealed
☐ HVAC duct penetrations sealed
☐ Plumbing penetrations sealed
☐ Ceiling penetrations addressed
☐ Vapor-control layer remains continuous
☐ Insulation is continuous
☐ Door perimeter properly sealed
☐ Glass enclosure transitions sealed
☐ Required firestopping completed
☐ Final inspection performed
A wine room cooling system can only perform as effectively as the enclosure allows.
Every penetration through the wine room envelope is a potential pathway for heat, air, and moisture. Properly planning, sealing, and inspecting these penetrations helps protect the controlled environment inside the wine room while reducing unnecessary strain on the cooling system.
For homeowners and contractors building a custom wine cellar, envelope sealing should be considered during the design stage—not as an afterthought once the racks and finishes are installed.
At CoolWineCellar, wine cellar design involves more than selecting wine racks and a cooling unit. Proper insulation, vapor control, glass construction, airflow, cooling requirements, and installation details all contribute to creating a reliable wine-storage environment.
For complex installations—particularly large glass wine rooms, tall wine walls, and wine cellars in hot and humid climates—coordinate the wine cellar design with qualified HVAC and building professionals to ensure the complete enclosure is appropriate for the project and applicable building codes.