
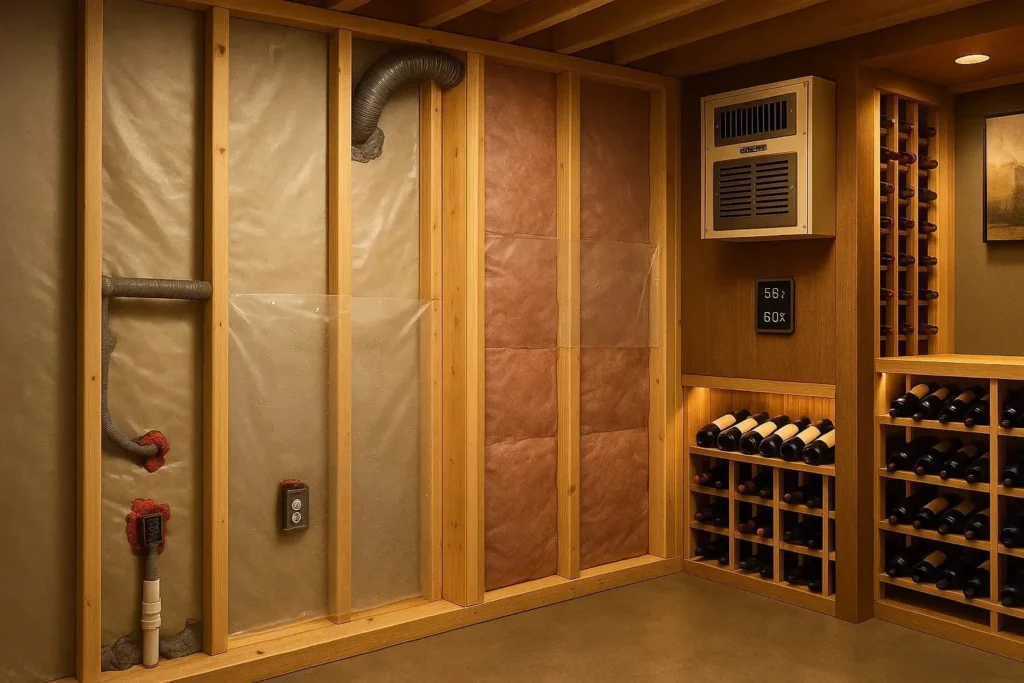
Think insulation is enough to protect your wine cellar? Think again. A missing vapor barrier is one of the biggest reasons DIY wine cellars develop mold, condensation, warped walls, and cooling system failures. If you’re investing in a wine collection, this is one step you can’t afford to overlook.
Why a Vapor Barrier Matters More Than Most People Realize
Many homeowners assume that insulating a room is all it takes to create a wine cellar. While insulation is essential, it only addresses temperature—not moisture.
A wine cellar operates at approximately 55°F with 50–70% relative humidity. That’s significantly cooler than the surrounding areas of most homes. When warm, humid air meets these cool surfaces, condensation forms inside walls, ceilings, and floors unless a properly installed vapor barrier blocks moisture migration.
Over time, that hidden moisture can lead to:
- Mold and mildew growth
- Rotten framing and drywall
- Rusted metal components
- Reduced insulation performance
- Higher cooling costs
- Premature failure of your wine cooling system
The damage usually happens behind finished walls, making it expensive to detect and repair.
What Exactly Is a Vapor Barrier?
A vapor barrier (also called a vapor retarder) is a continuous layer of moisture-resistant material installed between the conditioned wine cellar and the surrounding structure.
Its primary job is simple:
Prevent warm, moisture-laden air from entering the insulated wall cavity.
Without this protection, humidity slowly travels through drywall, insulation, and framing where it condenses into water droplets.
Common vapor barrier materials include:
- 6-mil polyethylene plastic sheeting
- Closed-cell spray foam insulation (when properly applied)
- Specialized vapor-retarding membranes
The key isn’t just the material—it’s creating a completely sealed envelope.
Why DIY Wine Cellars Often Skip This Step
Many online tutorials focus on building wine racks, installing drywall, or selecting cooling units.
Few explain building science.
Common DIY mistakes include:
Installing Insulation Without a Vapor Barrier
Fiberglass insulation alone does not stop moisture movement.
Instead, it can absorb moisture, lose effectiveness, and become a breeding ground for mold.
Assuming Drywall Is Enough
Standard drywall is not a moisture barrier.
Water vapor passes through drywall surprisingly easily.
Sealing Only the Obvious Areas
Many DIY builders seal large wall sections but leave gaps around:
- Electrical outlets
- Light fixtures
- HVAC penetrations
- Plumbing pipes
- Ceiling joints
- Door framing
Even tiny openings allow moisture to enter over time.
What Happens Without One?
Imagine cooling a room to 55°F while the rest of your home sits at 74°F with moderate humidity.
Warm indoor air naturally wants to move toward the cooler environment.
As that humid air reaches the cold wall cavity, it reaches its dew point.
The result?
Water.
Not once.
Every single day.
Over months and years this causes:
Mold Growth
Hidden mold colonies develop inside walls before becoming visible.
Wood Rot
Studs, plywood, and wood framing slowly deteriorate.
Insulation Failure
Wet insulation loses much of its R-value, forcing the cooling unit to work harder.
Condensation Around Glass
Improperly sealed wine rooms often develop foggy glass, dripping doors, and sweating walls.
Cooling Unit Overwork
Your refrigeration system must remove both heat and excess moisture, reducing efficiency and lifespan.
Where Should the Vapor Barrier Be Installed?
One of the most misunderstood parts of wine cellar construction is placement.
For climate-controlled wine cellars in warm or mixed climates, the vapor barrier is generally installed on the warm side of the insulation—between the home’s conditioned space and the insulated wine cellar wall assembly.
It should create one continuous sealed envelope around:
- Exterior walls
- Interior walls
- Ceiling
- Floor (when required)
- Around every penetration
Any break in the barrier becomes a pathway for moisture.
Don’t Forget the Ceiling
Ceilings are one of the most overlooked areas in DIY projects.
Warm air naturally rises.
Without a sealed ceiling vapor barrier:
- Moisture migrates upward.
- Condensation forms above drywall.
- Mold develops in attic spaces.
- Ceiling insulation becomes saturated.
Proper ceiling sealing is just as important as wall protection.
Glass Wine Cellars Need Even More Attention
Modern frameless glass wine rooms are beautiful—but they increase cooling loads and condensation risks.
Because glass transfers heat more readily than insulated walls, every detail matters:
- Double- or triple-pane insulated glass
- Thermally broken frames
- Proper perimeter sealing
- Complete vapor barrier integration
Skipping these details often results in condensation around glass panels and doors.
Spray Foam vs. Plastic Vapor Barriers
Many homeowners wonder whether spray foam eliminates the need for a vapor barrier.
The answer depends on the insulation type.
Closed-Cell Spray Foam
Benefits include:
- Excellent insulation value
- Air sealing
- Moisture resistance
- Can function as a vapor retarder when installed at the proper thickness
It’s often the preferred solution for wine cellars in humid climates because it combines insulation and moisture control in one application.
Fiberglass Insulation
Fiberglass provides thermal insulation but does not stop water vapor.
It should always be paired with a properly installed vapor barrier to prevent moisture problems.
Signs Your Existing Wine Cellar May Lack a Vapor Barrier
If your cellar experiences any of these issues, improper moisture control may be the culprit:
- Condensation on walls or glass
- Musty odors
- Mold near baseboards
- Cooling system runs continuously
- Peeling paint
- Soft drywall
- High humidity despite cooling
- Rising energy bills
Many homeowners initially blame the cooling unit when the real issue is hidden inside the walls.
Proper Vapor Barrier Installation Tips
A professional installation includes more than simply hanging plastic sheeting.
Best practices include:
- Overlap seams by several inches.
- Seal seams with vapor-barrier tape.
- Seal around electrical boxes and plumbing.
- Avoid punctures whenever possible.
- Use compatible sealants around framing.
- Ensure the barrier connects continuously from wall to ceiling.
- Inspect every penetration before drywall is installed.
Small gaps today can become major moisture problems later.
Why Professionals Rarely Skip This Step
Experienced wine cellar builders know that refrigeration systems are only one part of a successful installation.
Long-term performance depends on creating a controlled environment that limits heat gain and moisture intrusion.
That’s why professional wine cellar construction typically includes:
- Proper insulation design
- Continuous vapor barrier installation
- Airtight construction
- Correct cooling system sizing
- Humidity management
- High-performance wine cellar doors and glass
When these elements work together, the cooling unit runs more efficiently, operating costs stay lower, and your wine ages under stable conditions.
Frequently Asked Questions
Do all wine cellars need a vapor barrier?
Most climate-controlled wine cellars do. Without one, moisture can migrate into wall cavities and cause condensation, mold, and structural damage. Requirements may vary depending on local climate and building methods.
Is insulation alone enough?
No. Insulation slows heat transfer but does not prevent water vapor from moving through walls. A vapor barrier or appropriate moisture-control system is also needed.
Can I use spray foam instead of plastic sheeting?
Closed-cell spray foam can act as both insulation and a vapor retarder when installed correctly. Open-cell spray foam generally does not provide the same level of vapor resistance.
Where should the vapor barrier be installed?
In most wine cellar applications, it’s installed on the warm side of the insulation to help prevent moisture from reaching the cooled wall cavity. Local building codes and climate conditions should always be considered.
What happens if I skip the vapor barrier?
You increase the risk of hidden condensation, mold growth, damaged insulation, wood rot, higher energy bills, and reduced cooling system efficiency.
Can an existing wine cellar be retrofitted with a vapor barrier?
It may be possible, but it often requires removing finished wall surfaces. The best time to install a vapor barrier is during the initial construction or renovation phase.
Final Thoughts
A wine cellar is much more than attractive racks and a cooling unit. Behind the finished walls, a properly installed vapor barrier plays a vital role in protecting your investment. It keeps moisture out, improves cooling efficiency, and helps preserve both the structure of your cellar and the quality of your wine collection.
If you’re planning a DIY wine cellar, don’t let this hidden but essential step become the reason for costly repairs later. Build the enclosure correctly from the start, and your wine cellar will provide stable, dependable storage for many years to come.