Call Us 📞 800-323-3130
Mon–Fri 8am–6pm CST, Sat–Sun 9am–1pm CST
Free design consultations
Showrooms in Miami & Fort Lauderdale
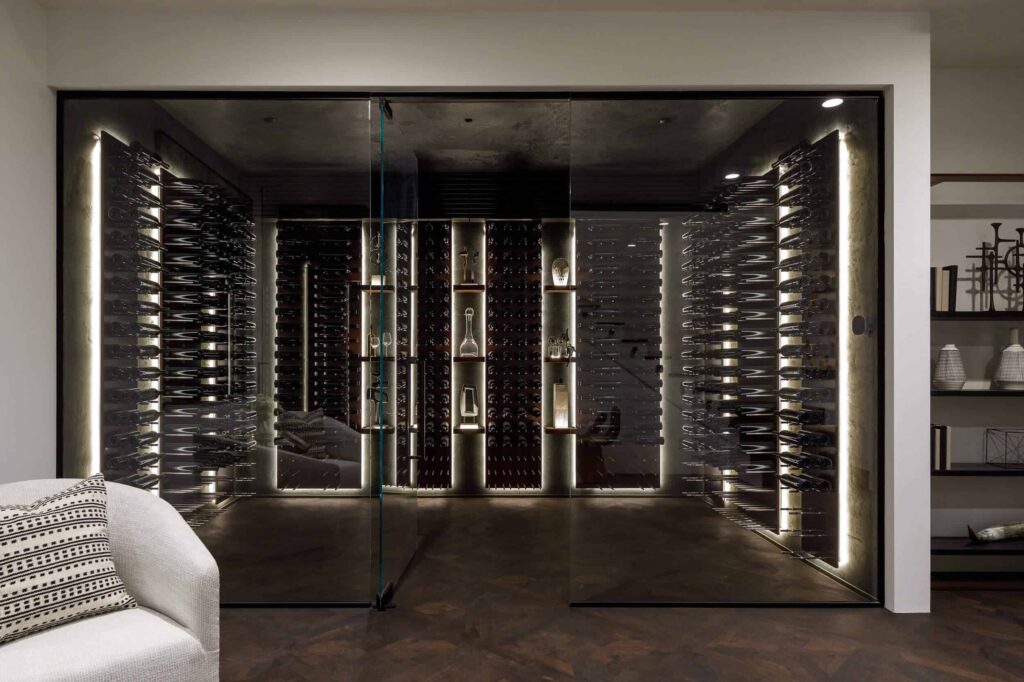
A beautiful wine wall should draw attention to the wine, the design, and the materials—not the screws, brackets, mounting plates, or other hardware holding everything together.
Whether you are designing a contemporary metal wine wall, a floating bottle display, a custom wood wine rack installation, or a floor-to-ceiling glass-enclosed wine cellar, hiding fasteners can make the difference between a standard installation and a refined architectural feature.
The secret to a seamless wine wall is not simply covering visible screws. It involves choosing the right mounting system, planning the structure before installation, coordinating finishes, and ensuring that every bottle remains securely supported.
In this guide, we explain how to conceal fasteners and hardware while maintaining the strength, safety, and clean appearance of a custom wine wall.
The easiest way to achieve a seamless appearance is to select a wine rack system engineered to minimize visible mounting hardware.
Some wall-mounted wine racks use concealed brackets, recessed mounting plates, or mounting components hidden behind the rack structure. Once installed, the bottles appear to float against the wall, creating a clean, minimalist presentation.
Popular options include:
Floating wine racks: Designed to create the appearance that bottles extend directly from the wall.
Concealed-bracket wine racks: Use hidden support components to reduce visible hardware.
Contemporary metal wine racks: Feature streamlined profiles and carefully integrated mounting points.
Individual bottle displays: Allow bottles to be arranged in precise rows with minimal visual interruption.
Custom wine rack systems: Can be designed around the wall dimensions, mounting requirements, and desired appearance.
When selecting a system, look beyond product photographs. Confirm how the rack attaches to the wall, whether the mounting hardware remains visible from the side, and whether any brackets or covers are included.
A rack that appears completely hardware-free in a marketing image may still require visible screws or mounting plates once installed.
Floating wine racks are popular in contemporary interiors because they emphasize the bottles rather than the supporting structure.
They work particularly well on accent walls, behind dining tables, in modern home bars, and in glass wine rooms where every detail is visible.
To achieve the floating effect:
Select a rack with an integrated or concealed mounting system.
Plan the mounting positions before finishing the wall.
Ensure the supporting structure can accommodate the rack and the intended bottle load.
Align the racks precisely so the bottles form consistent horizontal or vertical lines.
Conceal any permitted mounting components behind the rack body or designated covers.
Design tip: Consistent bottle spacing is just as important as concealed hardware. Even a premium floating wine rack can look unfinished if adjacent racks are installed at slightly different heights or angles.
For a particularly refined result, coordinate the rack finish with nearby cabinet hardware, lighting fixtures, window frames, or other architectural metalwork.
Not every wine rack uses a completely hidden mounting system. Some designs rely on screws or bolts for strength, especially when supporting multiple bottles or spanning a larger wall area.
In these situations, the goal is to make the mounting hardware as visually discreet as possible without compromising structural integrity.
Common approaches include:
Recessed mounting plates: Position the attachment points behind the visible rack structure.
Matching cover caps: Conceal screw heads using caps that coordinate with the rack’s finish.
Countersunk fasteners: Allow compatible screw heads to sit flush within a designed recess.
Integrated mounting channels: Hide attachment points within the rack’s profile.
Concealed brackets: Transfer the load to the wall while minimizing visible support components.
The appropriate method depends on the manufacturer’s design and the material being mounted.
Do not countersink, drill, or modify a rack’s structural components unless the manufacturer permits it. Similarly, cover caps should not be used to disguise loose or improperly installed fasteners.
For a black metal wine wall, matching black hardware may be sufficient to make the mounting points nearly disappear. For polished metal, bronze, or custom-finished racks, the hardware finish should be selected to complement the overall design.
One of the most important steps in achieving a seamless wine wall happens before the racks are installed.
Wall blocking and structural backing provide secure attachment points for the mounting hardware. Planning these supports during construction can eliminate the need for improvised brackets or awkwardly positioned fasteners later.
Depending on the wall construction and rack design, suitable support may include structural wood blocking, plywood backing, or attachment to appropriately positioned studs or engineered supports.
Why does this matter for appearance?
When secure mounting points are planned in advance, the installer has greater flexibility to position racks accurately, conceal permitted attachment hardware, and avoid unnecessary modifications to finished walls.
Before installation, confirm:
The total anticipated bottle weight.
The rack manufacturer’s mounting requirements.
The type and condition of the supporting wall.
The location of studs, blocking, or other approved attachment points.
The spacing and alignment of all mounting components.
Whether the wall finish can support the proposed installation details.
Drywall alone should not be assumed to provide adequate support for a heavily loaded wine rack. Use an attachment method appropriate for the wall construction, expected loads, and manufacturer’s instructions.
Metal wine racks are especially well suited to modern wine wall designs because their slim profiles can reduce visual clutter.
However, exposed screws, mounting plates, and inconsistent brackets can interrupt the clean lines that make these systems attractive.
Here are several ways to achieve a more cohesive result.
Choose a consistent finish. Black racks with black fasteners or bronze racks with coordinated mounting hardware create a more uniform appearance.
Align mounting components. When visible hardware cannot be eliminated, consistent positioning can make it feel like an intentional design detail rather than an installation flaw.
Use the manufacturer’s intended mounting system. Integrated brackets and mounting channels are generally preferable to improvised solutions.
Coordinate adjacent rack sections. When installing multiple sections, ensure that their spacing, heights, and alignment are consistent.
Plan around corners and edges. Side views often reveal mounting hardware that is hidden when looking straight at the wall. Review the design from the room’s main viewing angles before finalizing the installation.
For homeowners who want a particularly clean aesthetic, individual bottle racks and streamlined wall-mounted systems can help create a striking display without the appearance of bulky cabinetry.
Unlike slim metal racks, wood systems may include larger frames, side panels, trim pieces, and modular components. The key is to make these elements appear intentional and consistent.
Consider these techniques:
Conceal approved fasteners behind trim or within designated mounting recesses.
Use compatible wood plugs where the rack design allows them.
Coordinate the wood grain and finish of visible covers with the surrounding rack components.
Align modular sections carefully to minimize irregular gaps.
Integrate end panels and fillers into the surrounding millwork when appropriate.
Keep access to any required adjustment points and serviceable components.
Wood plugs can be an effective solution when the mounting design permits them. They should not be used to conceal structural problems or cover fasteners that must remain accessible.
For modular wood wine racks, follow the manufacturer’s assembly instructions. Modifying a kit to hide hardware may interfere with its structural connections or intended load distribution.
Glass wine walls require special attention because their transparency makes nearly every connection visible.
A glass enclosure may include metal frames, door hinges, handles, glass-to-glass joints, seals, and structural connections. These components have different purposes, and not all should be concealed.
To achieve a refined appearance, consider the following.
Coordinate the frame and hardware finishes
Select frame finishes, handles, hinges, and other visible components that work together. A consistent finish helps the enclosure feel like a single architectural feature.
Use the enclosure’s intended connection details
Glass systems may use specific channels, clamps, gaskets, or connection profiles. Use components approved for the selected system rather than substituting generic hardware.
Plan joints before fabrication
Glass dimensions, panel connections, frame profiles, and trim details should be resolved during the shop-drawing stage. This is particularly important when two glass panels meet at a central joint.
If you want a decorative trim piece covering a glass-to-glass joint, specify it before fabrication and confirm whether it is included in the original scope. An additional trim piece may require separate material, fabrication, or installation costs.
Distinguish structural hardware from decorative hardware
A visible connection may be essential to the enclosure’s strength or safe operation. Do not remove or cover structural fasteners, door hardware, or other required components simply to create a frameless appearance.
The best glass wine walls balance visual simplicity with properly engineered connections, appropriate seals, and practical maintenance access.
Trim can hide gaps, mounting plates, and transitions between adjacent materials. However, excessive trim can make a contemporary wine wall look heavy or dated.
The objective is to conceal visual interruptions while preserving the intended design.
Useful applications include:
Narrow trim pieces that coordinate with the rack or frame finish.
End panels that conceal exposed sides of a built-in installation.
Matching fillers that create a consistent transition between cabinetry and walls.
Manufacturer-approved cover profiles over designated joints.
Carefully detailed perimeter trim around integrated millwork.
For a minimalist metal wine wall, a narrow, coordinated cover may be more appropriate than a large decorative molding.
For a custom wood wine wall, integrated end panels or matching millwork may provide a more natural finish.
Before adding trim, confirm that it will not interfere with bottle removal, rack adjustment, door operation, airflow, or access to necessary fasteners.
Important: Decorative trim is not a substitute for proper structural support. It should conceal an appropriate connection, not compensate for a poorly designed or improperly installed one.
Even when every screw is hidden, a wine wall can look unfinished if the racks are misaligned.
Precision is particularly important when installing individual bottle racks in a grid or combining several rack sections into one continuous display.
For the best results:
Establish a level reference line before installation.
Confirm the wall dimensions and finished surface.
Mark all mounting locations using the manufacturer’s specified spacing.
Use suitable measuring and alignment tools.
Verify the position of each rack before tightening the fasteners.
Inspect the completed wall from the front, sides, and normal viewing positions.
Pay particular attention to the outer edges of the display. Consistent spacing along the perimeter helps the installation look deliberate and professionally finished.
If the wall is uneven, address the underlying surface or use an approved adjustment method rather than forcing the racks into alignment.
A seamless appearance should never come at the expense of safety or serviceability.
Common mistake | Better approach |
|---|---|
Using decorative caps to hide loose screws | Correct the attachment and verify that the rack is secure |
Installing heavy racks into drywall without suitable support | Use an approved mounting method suited to the wall and load |
Mixing visibly different screw finishes | Specify coordinated hardware before installation |
Drilling additional holes into finished racks | Follow manufacturer-approved mounting details |
Covering every fastener with permanent trim | Preserve access to hardware that may require inspection or adjustment |
Adding trim after installation without checking dimensions | Plan joint and trim details before fabrication |
Hiding structural connections behind decorative components | Keep all required structural connections properly installed and accessible where necessary |
The most effective seamless designs are planned from the beginning. Trying to conceal hardware after a wine wall has been installed often creates unnecessary expense and can compromise the finish.
A seamless wine wall is the result of coordinated design, careful engineering, and precise installation. The rack selection, wall construction, mounting hardware, trim details, and surrounding finishes should all be considered together.
At Cool Wine Cellar, we offer a range of wine storage solutions, including contemporary metal wine racks, floating wine racks, custom wood wine racks, and glass-enclosed wine walls.
Whether you prefer an almost invisible floating display or a floor-to-ceiling wine wall with coordinated metal finishes, planning the mounting details early can help you achieve the appearance you want without compromising structural integrity.
Can wine racks be installed without visible screws?
Yes. Some wine rack systems use concealed brackets, integrated mounting channels, recessed fasteners, or cover caps. The available options depend on the rack design and the wall construction. Always verify that the concealed mounting method is approved for the intended bottle load.
How do floating wine racks attach to the wall?
Floating wine racks typically attach through concealed brackets, mounting plates, or other manufacturer-designed connections. The specific method varies by product. Appropriate wall support and correct installation are essential for safely supporting the bottles.
How do I hide screws on black metal wine racks?
Use the manufacturer’s approved concealed mounting system where available. If fasteners remain visible, coordinated black hardware or compatible cover caps can make them less noticeable. Avoid modifying structural components without the manufacturer’s approval.
Can trim hide the joint between two wine wall panels?
Yes, a suitable decorative trim piece can cover certain joints between panels or adjacent components. However, the trim must be compatible with the system and should not interfere with structural connections, seals, or movement. For glass enclosures, confirm joint and trim details before fabrication.
Should I hide all the hardware on a glass wine wall?
No. Some hinges, handles, clamps, and fasteners are necessary for structural support and safe operation. The goal is to coordinate or minimize their visual impact while preserving required functionality and access.
Can I conceal fasteners on existing wine racks?
In many cases, yes. Options may include compatible cover caps, approved trim, or replacement mounting components. Before modifying an existing installation, check the rack manufacturer’s instructions and ensure that the proposed change will not affect its strength or stability.
Does hiding fasteners increase the cost of a wine wall?
It can. Concealed mounting systems, custom brackets, coordinated finishes, additional trim, and specialized installation may increase material and labor costs. Planning these details early can help avoid expensive modifications after installation.
The most sophisticated wine walls make the supporting hardware feel almost invisible. By choosing the right rack system, planning secure mounting points, coordinating finishes, and detailing joints carefully, you can create a wine display that complements your home’s architecture.
Explore the wine rack collections at Cool Wine Cellar to discover contemporary and custom wine storage options for your next project.